> ## Documentation Index
> Fetch the complete documentation index at: https://academy.uagenius.ai/llms.txt
> Use this file to discover all available pages before exploring further.
# Publish to Meta
> Upload finished variations to Meta using reusable templates.
Getting creatives live on Meta normally means entering the same campaign, ad set, page, copy and CTA for every single ad. UAGenius collapses that into configure once, apply everywhere, upload in minutes.
You can start from either end:
* From a project's results view in Video Studio: **Select All → Upload ads → Meta**.
* From [Projects](/projects): select the creatives you want and choose **Upload to Meta** from the upload options.
A connected Meta Ads manager account is required. See [Integrations](/integrations).
## Templates come first
The flow opens on **Select a template**. A template stores the settings you would otherwise re-enter on every upload: ad account, page, copy and campaign placement.
You have three ways forward:
Pick a saved template and its settings apply to the whole batch.
Build and save a configuration for reuse.
Configure this one upload row by row.
 Templates are named for the job they do, for example *High Spend Scaling*, *Relaunch Creatives* or *Creative Refresh*. Naming them after the campaign intent rather than the ad account makes the right one easy to pick when you are moving quickly.
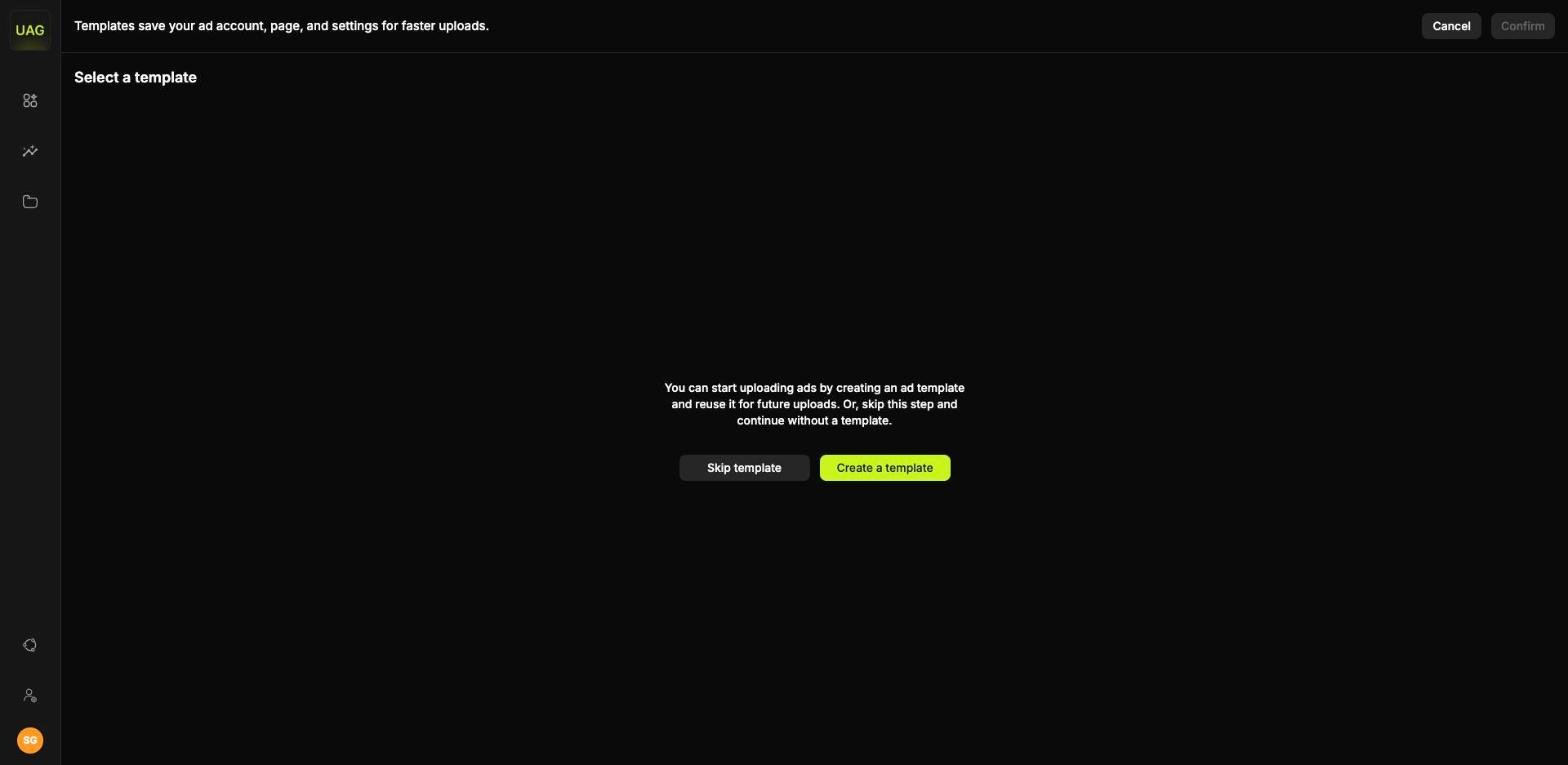
On a game with no templates yet, this screen offers just **Skip template** and **Create a template**. Your saved templates appear here once you have built one.
## Building a template
Use the intent rather than the date, since you will be choosing from this list for months.
This is where the ads are created.
The page the ads run under.
A multi-select controlling which sections the template carries. Each attribute you tick adds its own configuration section below.
Templates are named for the job they do, for example *High Spend Scaling*, *Relaunch Creatives* or *Creative Refresh*. Naming them after the campaign intent rather than the ad account makes the right one easy to pick when you are moving quickly.
On a game with no templates yet, this screen offers just **Skip template** and **Create a template**. Your saved templates appear here once you have built one.
## Building a template
Use the intent rather than the date, since you will be choosing from this list for months.
This is where the ads are created.
The page the ads run under.
A multi-select controlling which sections the template carries. Each attribute you tick adds its own configuration section below.
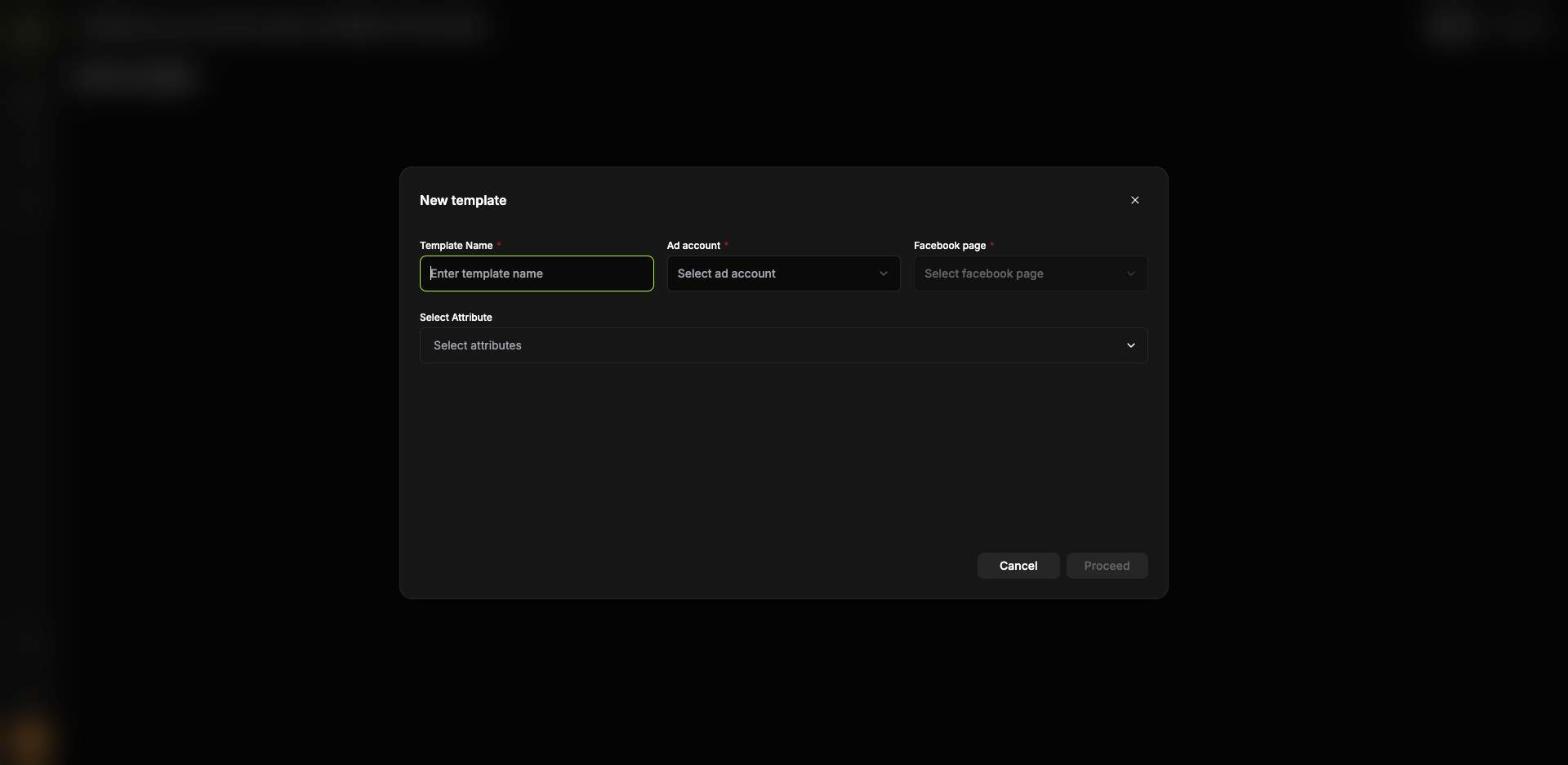 Template name, ad account and Facebook page are all required, and the page list populates once you have picked an account.
### Attributes
Template name, ad account and Facebook page are all required, and the page list populates once you have picked an account.
### Attributes
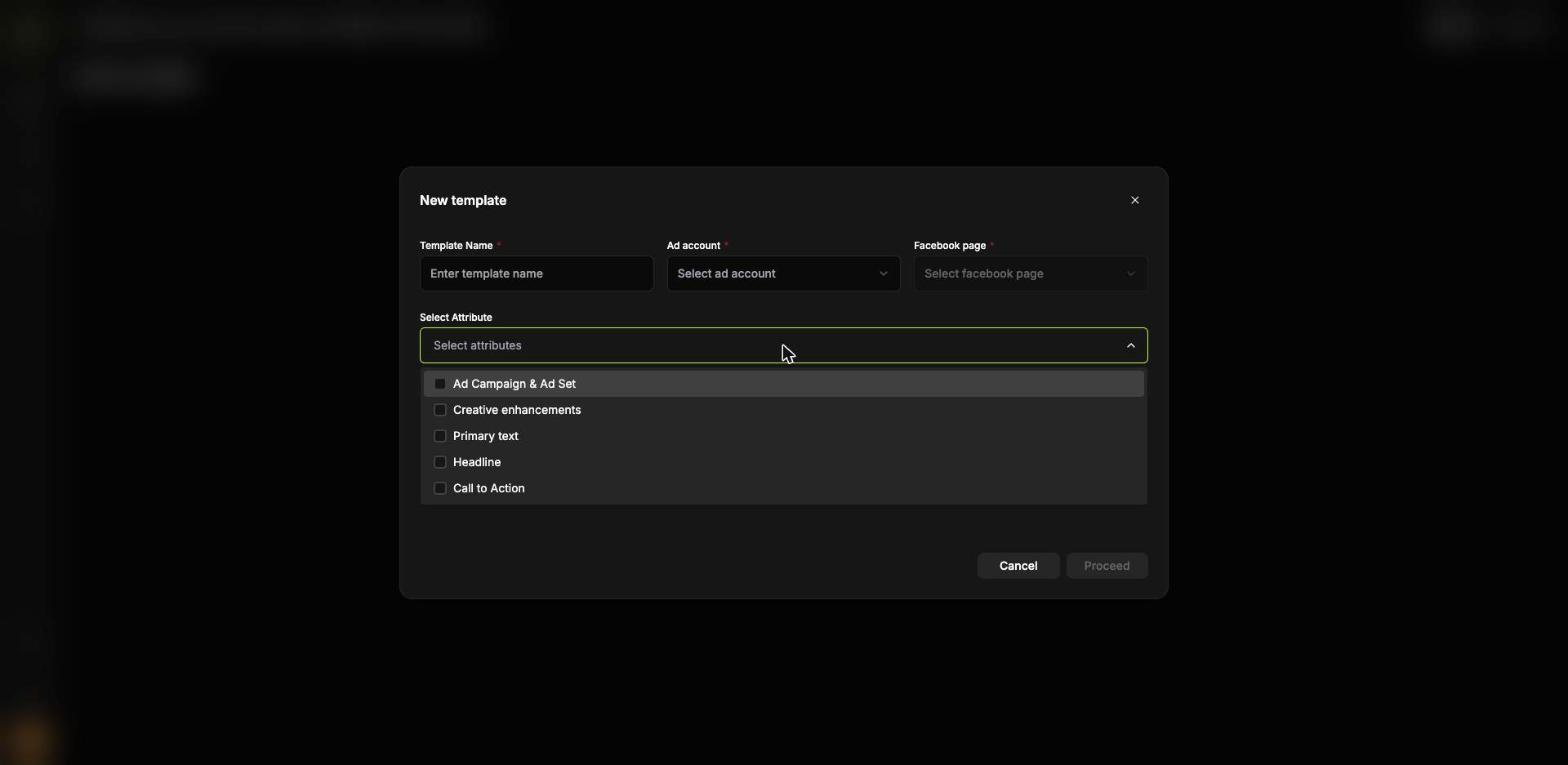 | Attribute | What it stores |
| ------------------------- | -------------------------------------------------------------------------------------------------------------------------------------------------------------- |
| **Ad Campaign & Ad Set** | The campaign and ad set the ads are created in, chosen from your existing campaigns. Shows Meta's limit for that ad set and how many slots are already filled. |
| **Creative enhancements** | The Advantage+ settings described below. |
| **Primary text** | The body copy. Up to **5** per template. |
| **Headline** | The ad headline. Up to **5** per template. |
| **Call to Action** | The CTA button, chosen from a dropdown: Download now, Install now, Shop now, Use app, Learn More or Sign up. |
Every attribute you set is applied across all the ads using that template. Anything you skip stays open, so you can still set it on an individual ad later.
Meta ad sets hold up to 50 ads, and the capacity indicator shows how much room is left. Checking it before a large batch lets you create a fresh ad set in advance if you need one.
### Managing templates
| Attribute | What it stores |
| ------------------------- | -------------------------------------------------------------------------------------------------------------------------------------------------------------- |
| **Ad Campaign & Ad Set** | The campaign and ad set the ads are created in, chosen from your existing campaigns. Shows Meta's limit for that ad set and how many slots are already filled. |
| **Creative enhancements** | The Advantage+ settings described below. |
| **Primary text** | The body copy. Up to **5** per template. |
| **Headline** | The ad headline. Up to **5** per template. |
| **Call to Action** | The CTA button, chosen from a dropdown: Download now, Install now, Shop now, Use app, Learn More or Sign up. |
Every attribute you set is applied across all the ads using that template. Anything you skip stays open, so you can still set it on an individual ad later.
Meta ad sets hold up to 50 ads, and the capacity indicator shows how much room is left. Checking it before a large batch lets you create a fresh ad set in advance if you need one.
### Managing templates
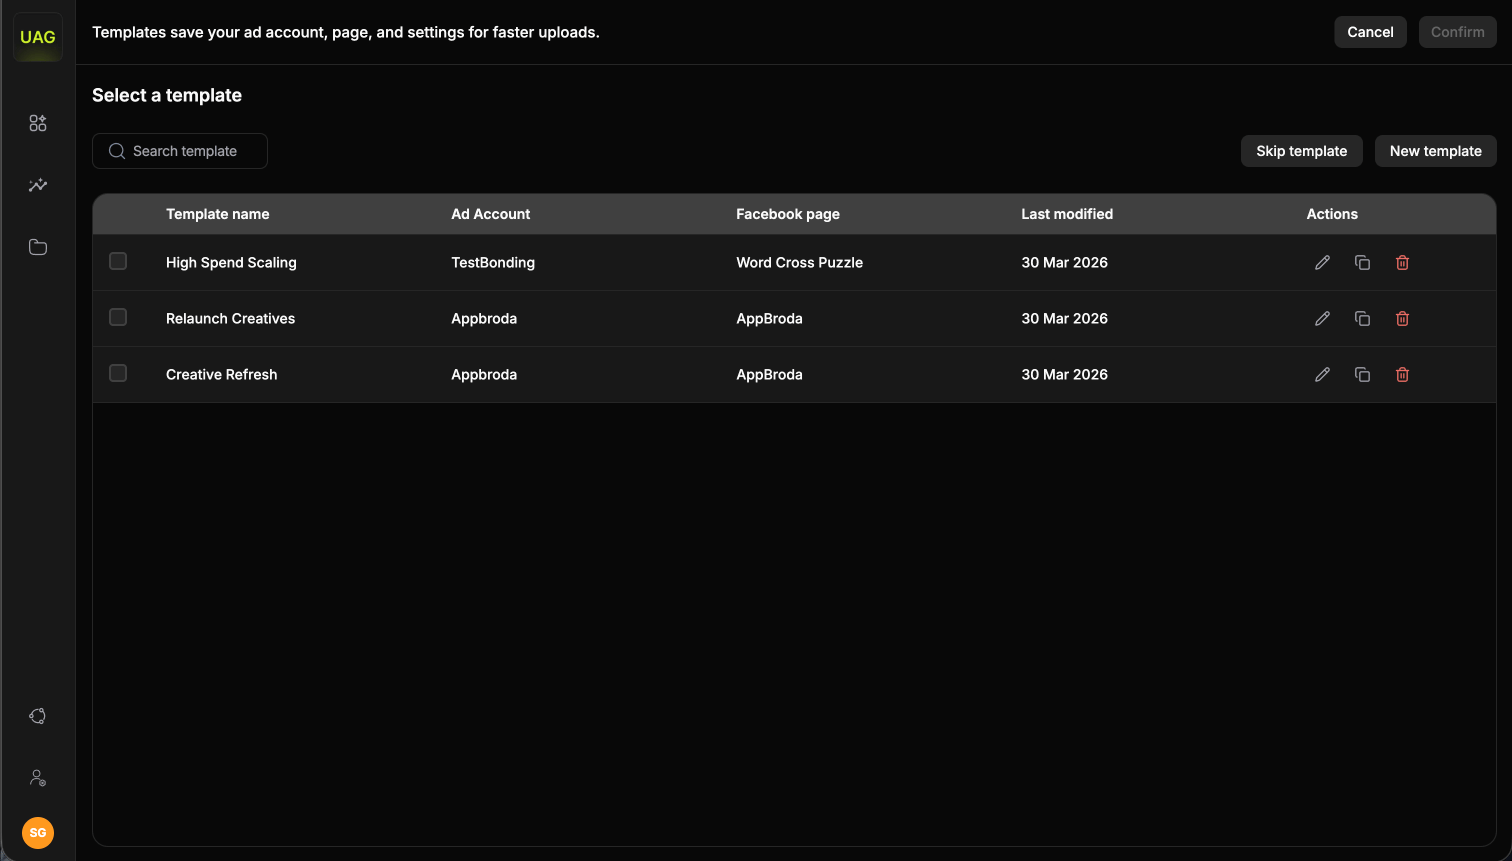 Any template can be updated, duplicated or deleted whenever you need. Your list grows with your workflow, so if a campaign structure changes you update the template, and if you need a slight variation you duplicate it and adjust.
Adding several **Primary text** variants multiplies your test coverage without rendering anything new. Twelve video variations against three copy variants gives you 36 combinations of creative and copy at no extra generation cost.
## Advantage+ enhancements
Meta's automatic creative adjustments, grouped by format. Tick the ones you want Meta to apply.
* Add overlays
* Visual touch-ups
* Add animation
* Text improvements
* Add details to ad layout
* Music
* Translate text
* Text improvements
* Relevant comments
* Video effects
* Sticker CTA
* Video touchups
* Add details to ad layout
* Visual touch-ups
* Add music
* Highlight carousel card
* Add details to ad layout
* Relevant comments
* Enhance CTA
These enhancements let Meta adjust the creative you composed, including adding text and effects. Leaving them off keeps a controlled creative test clean. Turning them on often helps when you are scaling a proven winner.
## Review before you upload
Selecting a template and confirming brings every creative through as its own row, with the settings from the template already filled in. Each row is one ad.
Any template can be updated, duplicated or deleted whenever you need. Your list grows with your workflow, so if a campaign structure changes you update the template, and if you need a slight variation you duplicate it and adjust.
Adding several **Primary text** variants multiplies your test coverage without rendering anything new. Twelve video variations against three copy variants gives you 36 combinations of creative and copy at no extra generation cost.
## Advantage+ enhancements
Meta's automatic creative adjustments, grouped by format. Tick the ones you want Meta to apply.
* Add overlays
* Visual touch-ups
* Add animation
* Text improvements
* Add details to ad layout
* Music
* Translate text
* Text improvements
* Relevant comments
* Video effects
* Sticker CTA
* Video touchups
* Add details to ad layout
* Visual touch-ups
* Add music
* Highlight carousel card
* Add details to ad layout
* Relevant comments
* Enhance CTA
These enhancements let Meta adjust the creative you composed, including adding text and effects. Leaving them off keeps a controlled creative test clean. Turning them on often helps when you are scaling a proven winner.
## Review before you upload
Selecting a template and confirming brings every creative through as its own row, with the settings from the template already filled in. Each row is one ad.
 ### Edit a single ad
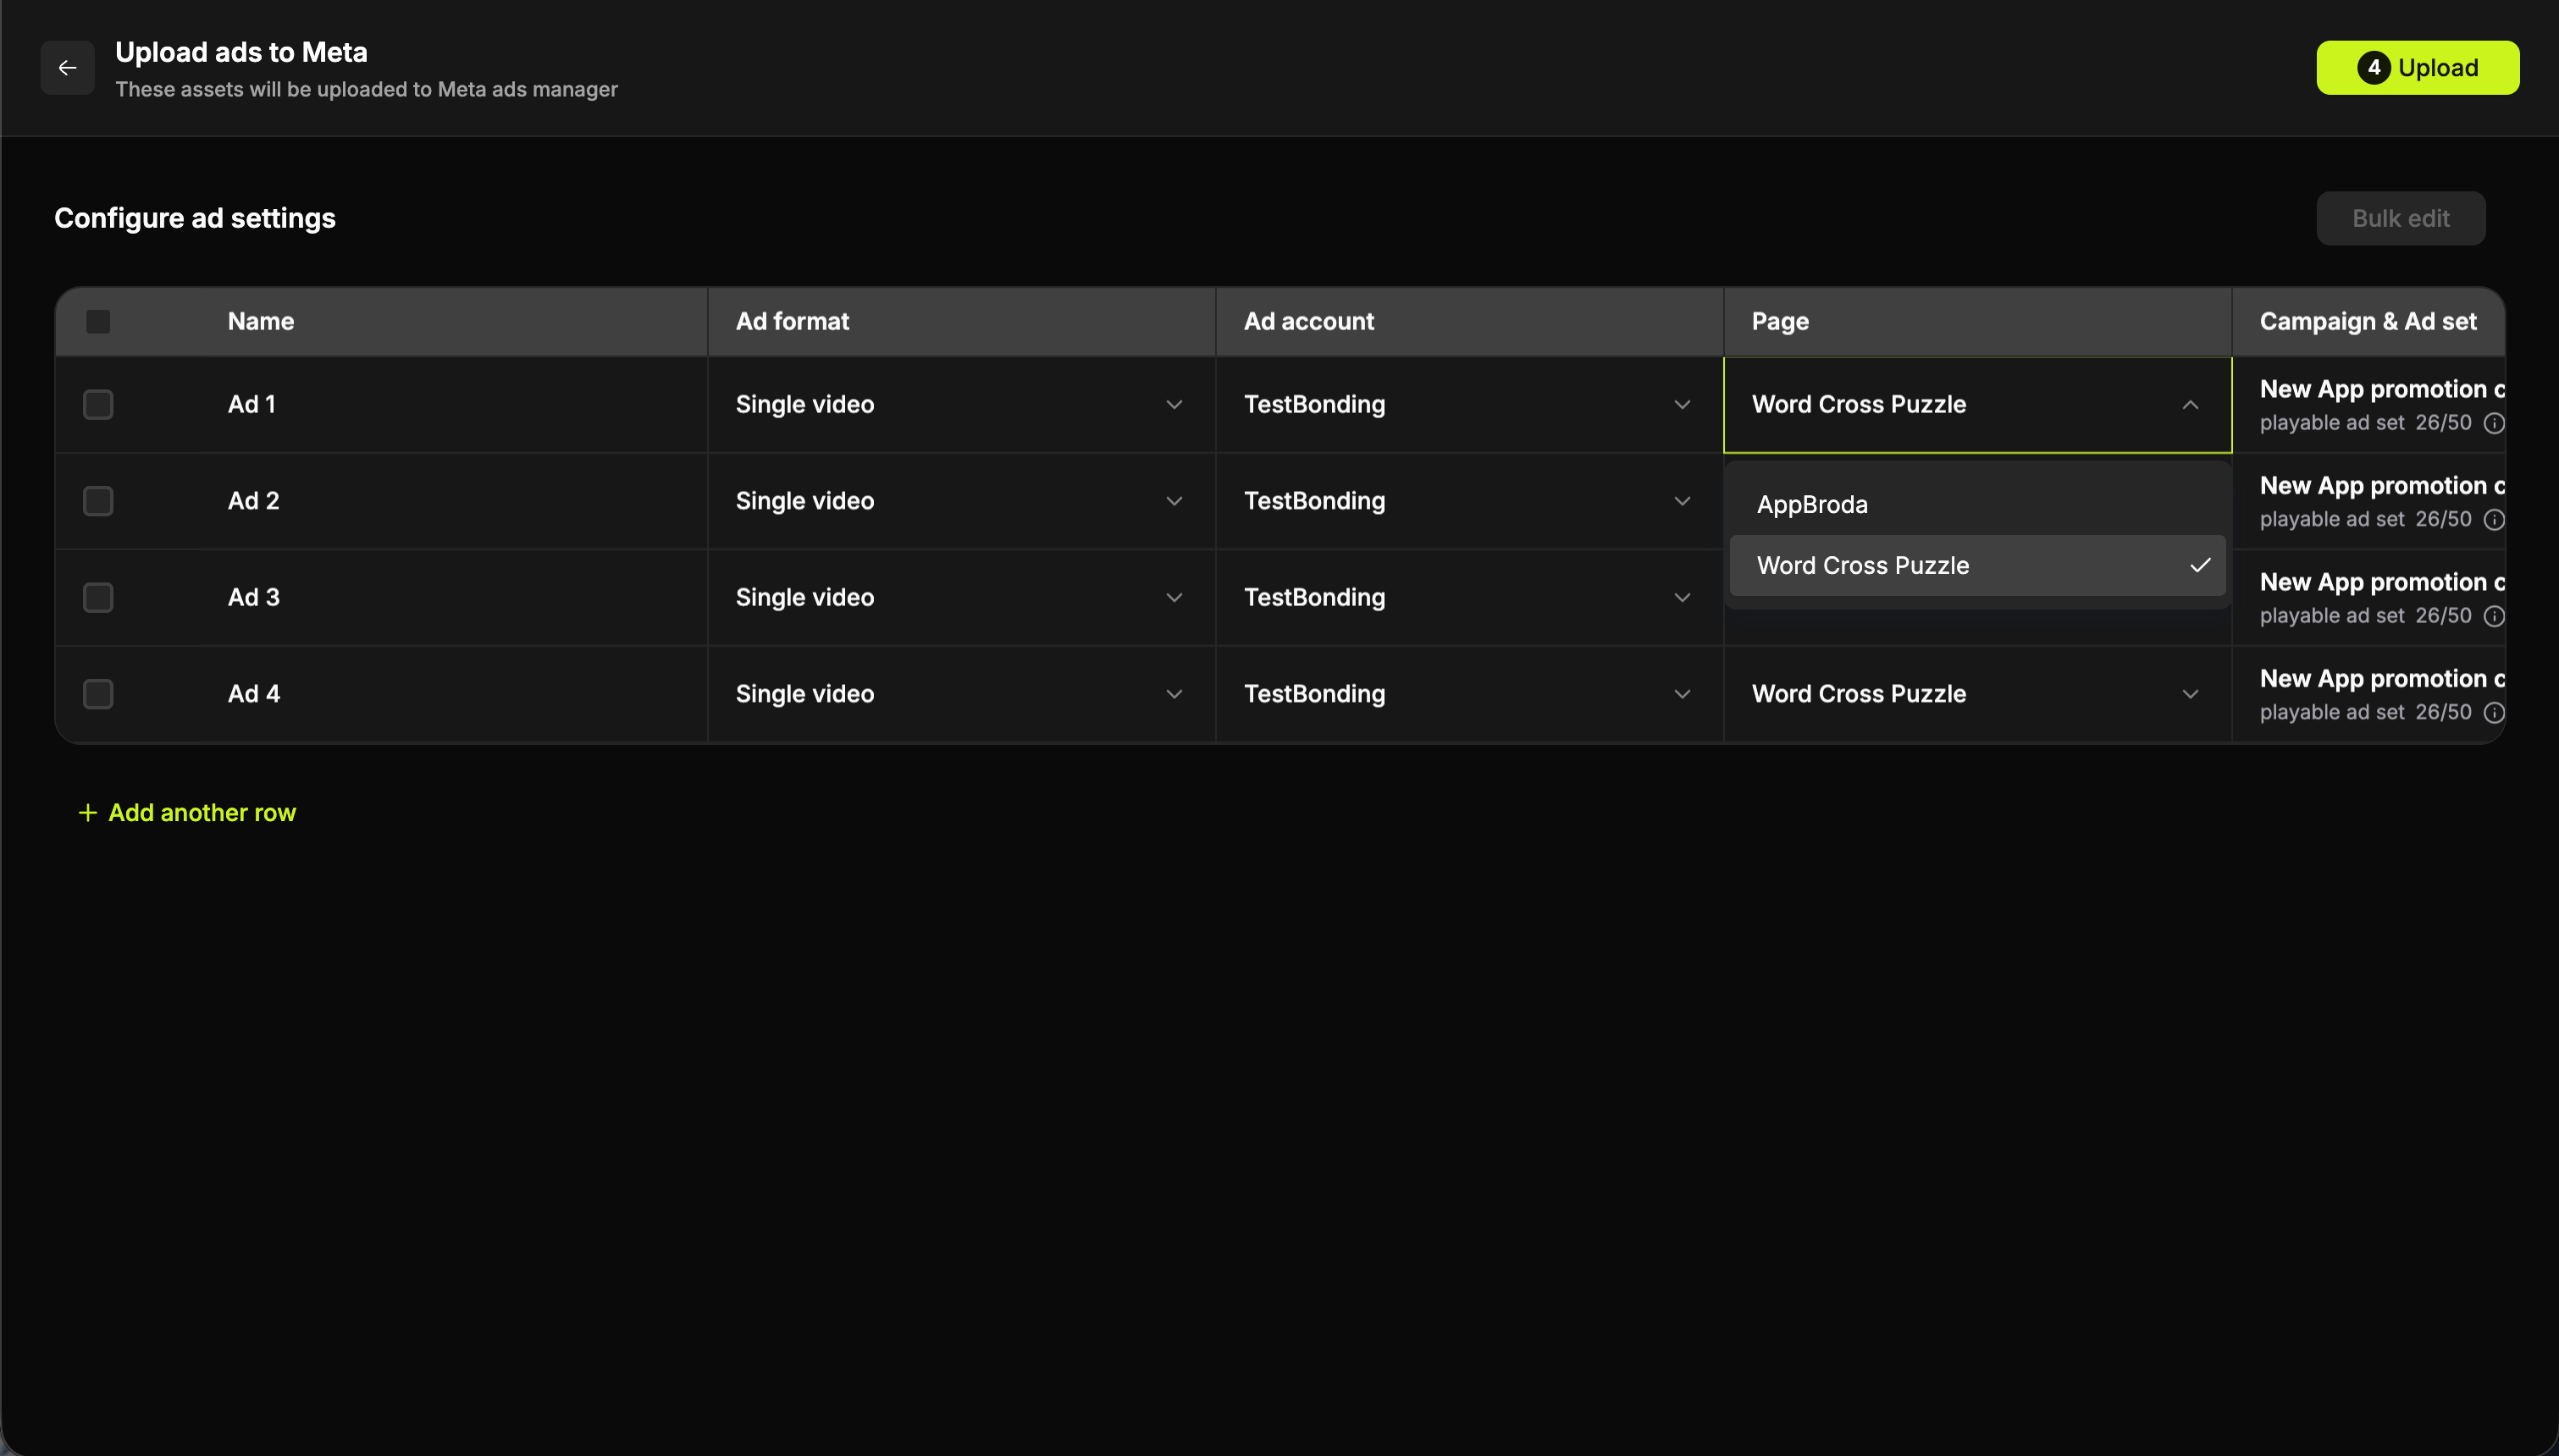
Every row stays editable, so if one ad needs something different you change it there without touching the rest. You can swap the ad format, pick a different headline, update the primary text or choose another CTA.
If an ad needs extra assets, as a Carousel does, you can pull them from the creatives you already selected or from [Projects](/projects).
A row with something missing or misconfigured carries an error icon, so before you upload you can see exactly which ads need attention and why.
### Bulk edit
### Edit a single ad
Every row stays editable, so if one ad needs something different you change it there without touching the rest. You can swap the ad format, pick a different headline, update the primary text or choose another CTA.
If an ad needs extra assets, as a Carousel does, you can pull them from the creatives you already selected or from [Projects](/projects).
A row with something missing or misconfigured carries an error icon, so before you upload you can see exactly which ads need attention and why.
### Bulk edit
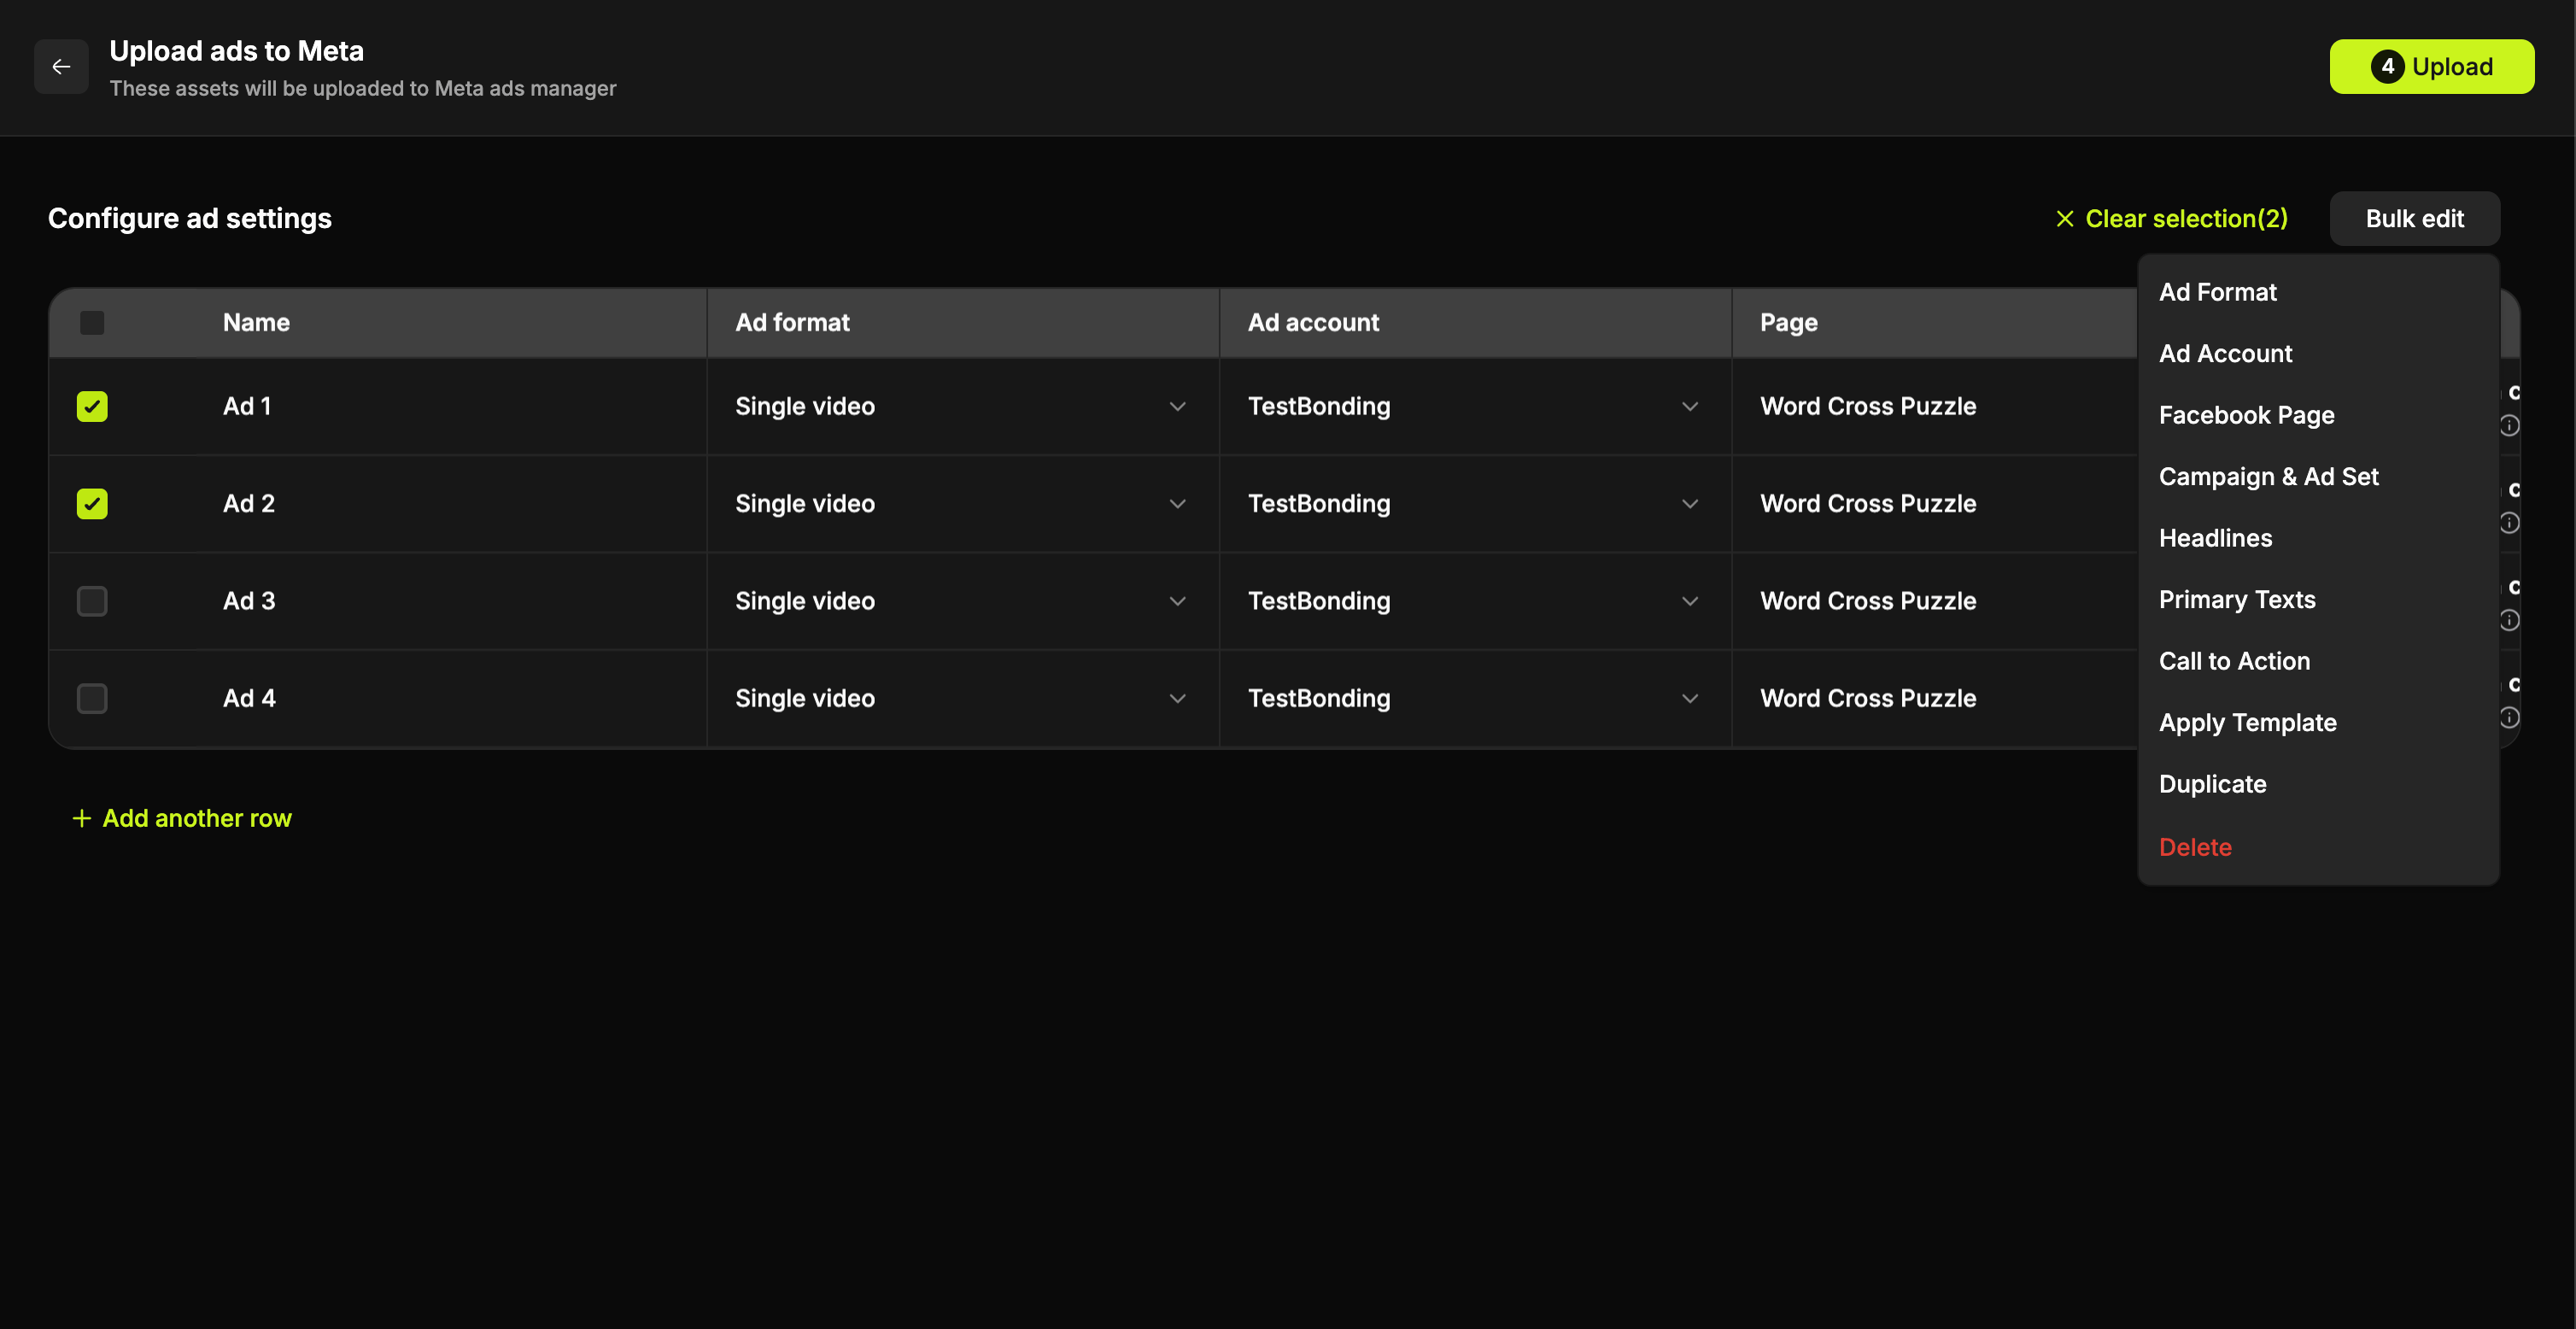 Any change can go across many rows at once. Select the rows, choose your action in **Bulk edit**, and it applies to all of them. If a group of ads needs a different campaign, ad set and CTA, you make that change once.
Bulk edit can apply an entirely different template to the rows you select, which gives those ads a different page, campaign and settings in one move. Useful when a single batch is going to two places.
## The skip-template path
Choosing **Skip template** goes straight to a **Configure ad settings** table, one row per selected asset:
| Column | Options |
| --------------------- | ------------------------------------------------- |
| **Name** | The ad name. |
| **Ad format** | Single image, Single video, Carousel or Flexible. |
| **Ad account** | Which connected account. |
| **Page** | Which Facebook page. |
| **Campaign & Ad set** | Where the ad is created. |
**Bulk edit** applies a value down a whole column, which is the quick way to handle 20 rows at once. **+ Add another row** adds an entry.
This path suits one-off uploads. Once you find yourself configuring the same values twice, saving a template will pay for itself.
## After uploading
Any change can go across many rows at once. Select the rows, choose your action in **Bulk edit**, and it applies to all of them. If a group of ads needs a different campaign, ad set and CTA, you make that change once.
Bulk edit can apply an entirely different template to the rows you select, which gives those ads a different page, campaign and settings in one move. Useful when a single batch is going to two places.
## The skip-template path
Choosing **Skip template** goes straight to a **Configure ad settings** table, one row per selected asset:
| Column | Options |
| --------------------- | ------------------------------------------------- |
| **Name** | The ad name. |
| **Ad format** | Single image, Single video, Carousel or Flexible. |
| **Ad account** | Which connected account. |
| **Page** | Which Facebook page. |
| **Campaign & Ad set** | Where the ad is created. |
**Bulk edit** applies a value down a whole column, which is the quick way to handle 20 rows at once. **+ Add another row** adds an entry.
This path suits one-off uploads. Once you find yourself configuring the same values twice, saving a template will pay for itself.
## After uploading
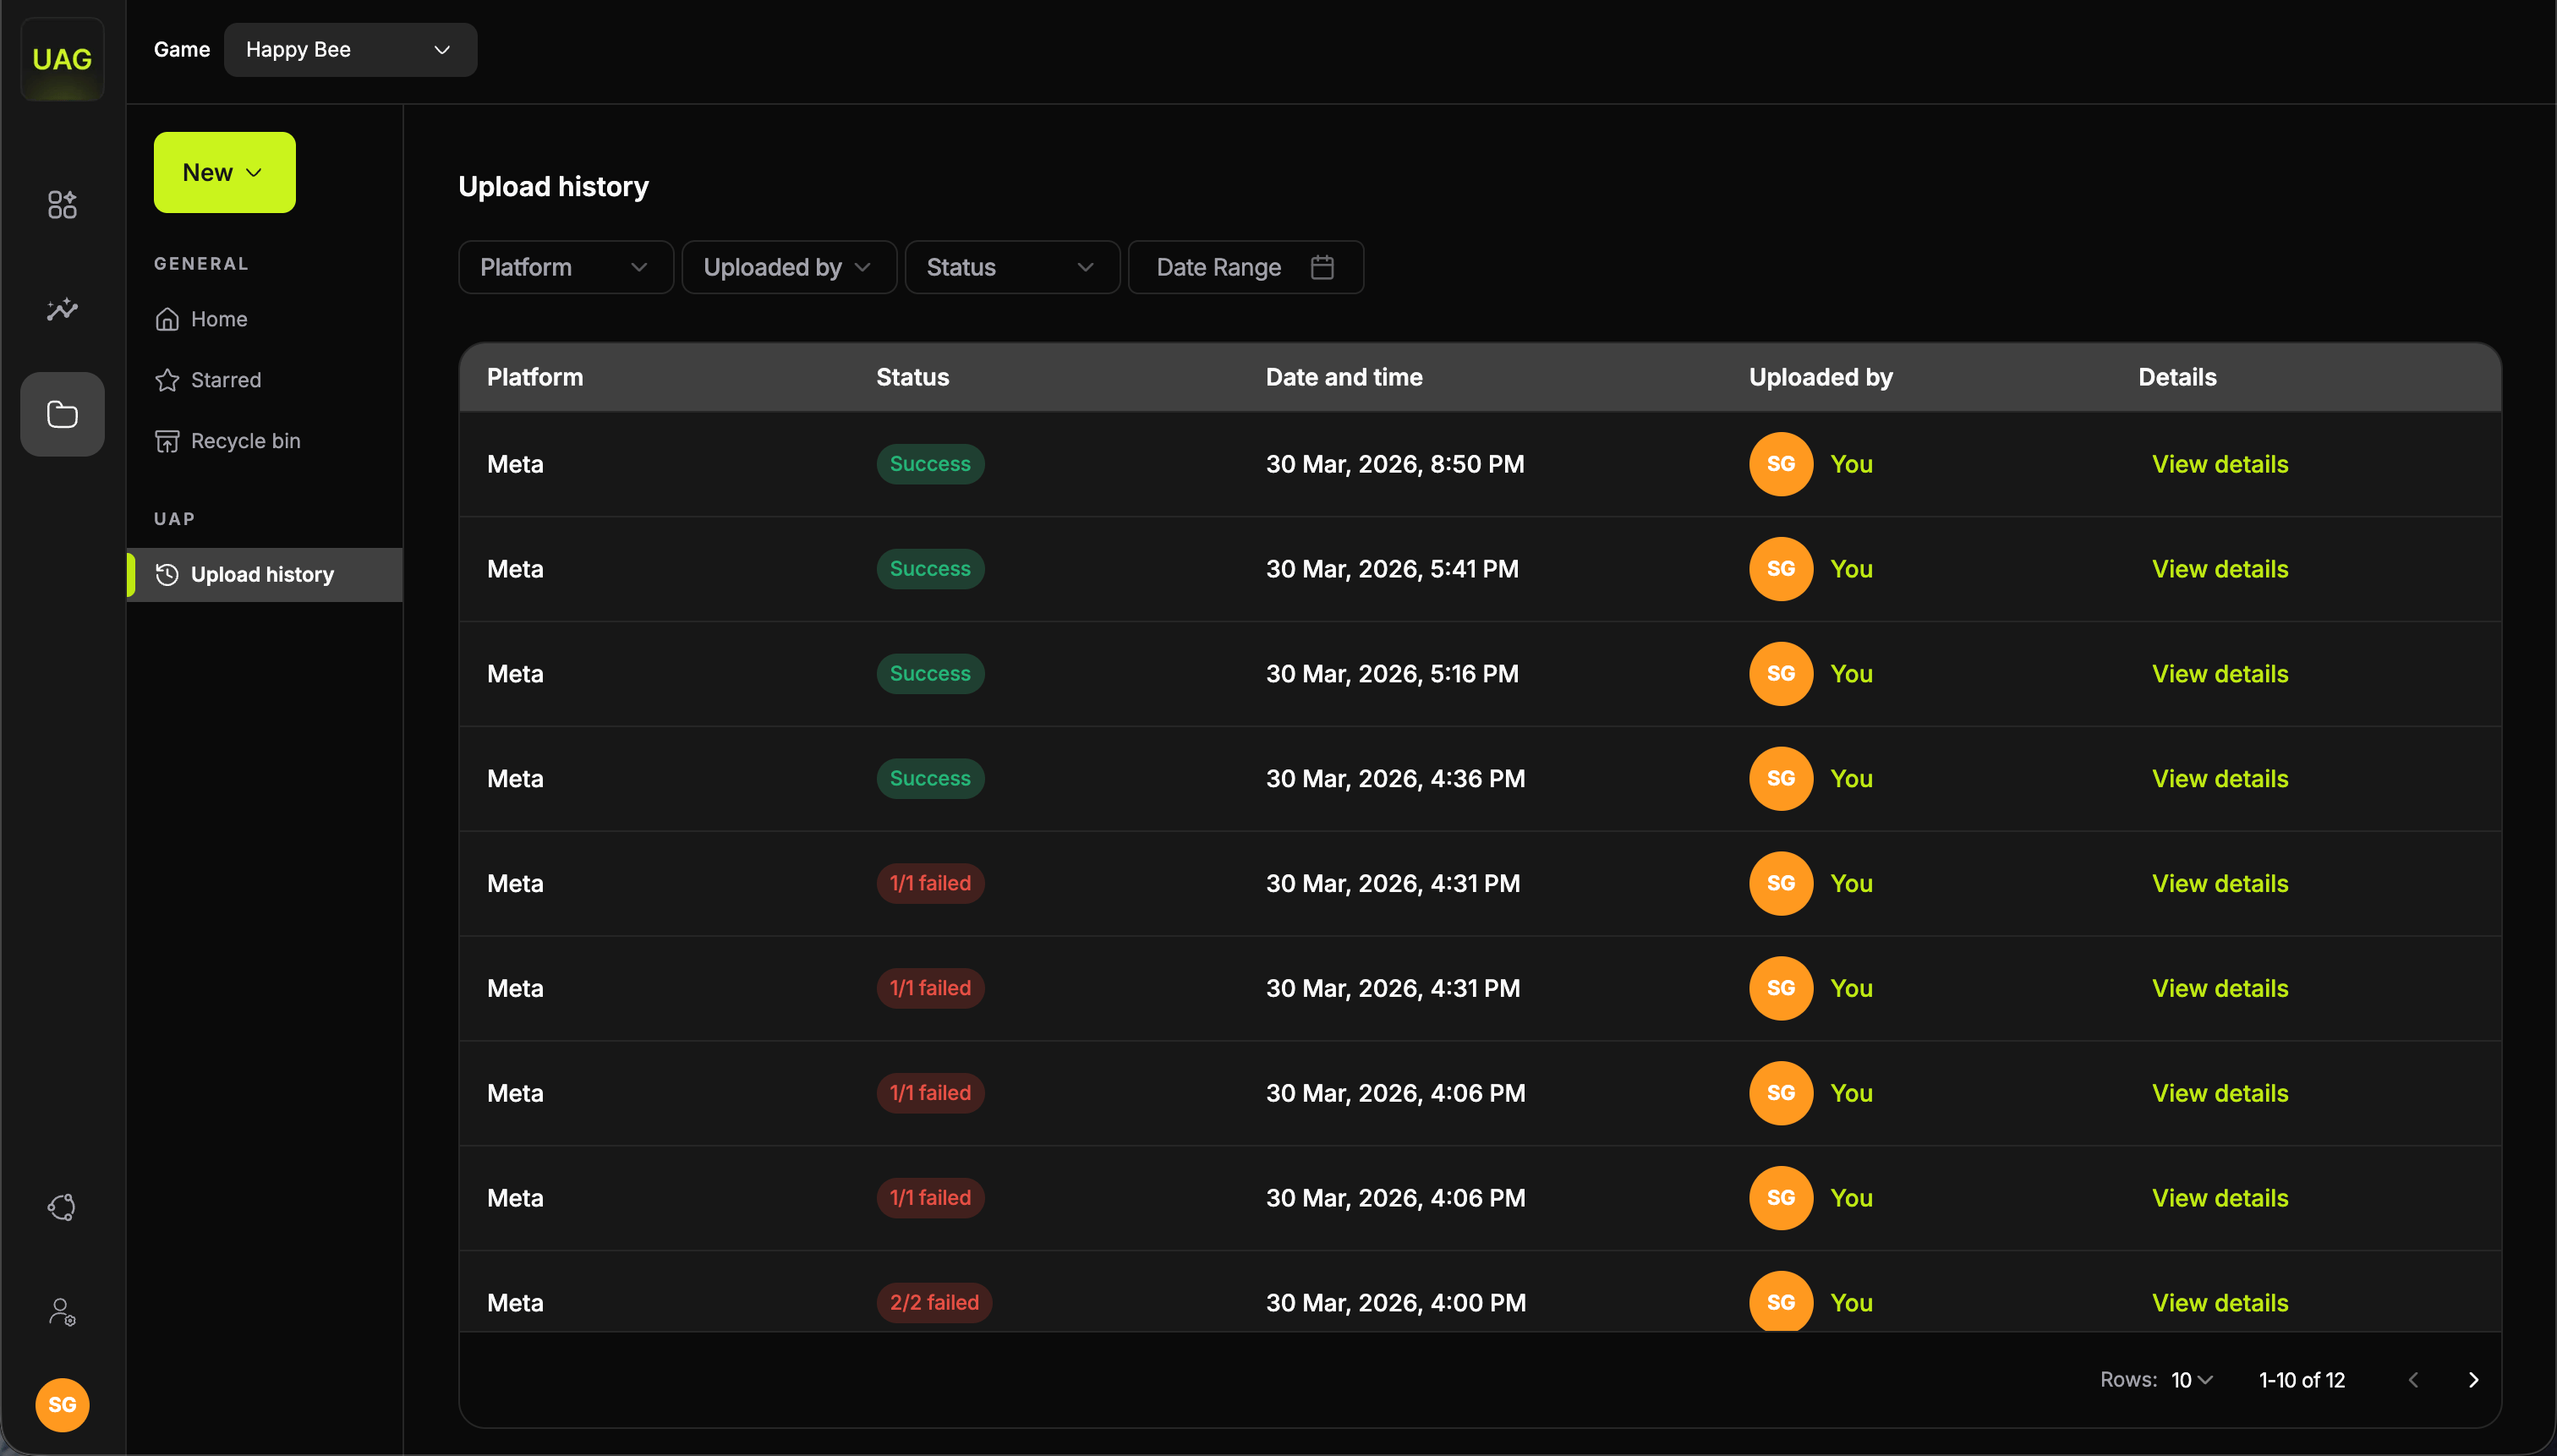 The batch appears in **Upload history** in the [Projects](/projects) sidebar straight away, with its current processing status. Each entry records the platform, the status, the date and time, and who uploaded.
Expand a batch and every creative carries its own status message, pulled directly from Meta:
| Status | What it means |
| ----------------- | ---------------------------------------------------------- |
| **Green** | The ad went through. |
| **yellow** | Still processing. |
| **Error message** | Meta returned a reason, and it names what needs attention. |
There is no need to switch to Meta Ads Manager to find out what happened, since it is all tracked here.
## The loop
Select your ads, choose a template, review the rows, upload.
Each template you build makes the next upload faster, and each batch adds to your upload history. Over time your main campaign types already have templates behind them, and getting a fresh batch of creatives live becomes the quickest part of the process rather than the slowest.
The batch appears in **Upload history** in the [Projects](/projects) sidebar straight away, with its current processing status. Each entry records the platform, the status, the date and time, and who uploaded.
Expand a batch and every creative carries its own status message, pulled directly from Meta:
| Status | What it means |
| ----------------- | ---------------------------------------------------------- |
| **Green** | The ad went through. |
| **yellow** | Still processing. |
| **Error message** | Meta returned a reason, and it names what needs attention. |
There is no need to switch to Meta Ads Manager to find out what happened, since it is all tracked here.
## The loop
Select your ads, choose a template, review the rows, upload.
Each template you build makes the next upload faster, and each batch adds to your upload history. Over time your main campaign types already have templates behind them, and getting a fresh batch of creatives live becomes the quickest part of the process rather than the slowest.